


.png)


.png)


.jpg)


.jpg)


.jpg)


.JPG)

Tuesday 26 April 2011
Dangerous Brian!
Welcome to Brian, whose blog is here. He has loads of really good RPG ideas, and Warhammer Ancients Battles amongst other goodies. Do go and say hello.
Saturday 23 April 2011
Macedonians fail in Syria
On Tuesday the second half of the Empire campaign got off to a resounding start with the Macedonians attacking into Syria, again, and failing, again. Deployment map:
 Terrain was a large low ridge favouring the defenders and an offset smaller hill on the attackers' right. The invaders are in blue. From the top left as you look at it, their right wing (Simon) has 8 Skythian horse archers; 12 Greek light horse; two units each with two elephants; and a large unit of 18 Peltasts. Their centre (Billy) has a large unit of 48 elite phalangites; a smaller unit of 32 veteran phalangites; and three units of 32 standard medium phalangites. Their left (William) is led by a large unit of 18 elite Companion lancers, supported by 14 Greek medium cavalry, 12 light cavalry, and 8 Skythians. Loads of missile skirmishers are in front of most of the army. Leading with the left, then...
I built the Seleucid defenders, and deployed them symmetrically. I will run the left wing: 12 javelin-armed light cavalry; 8 Skythians; 12 Comapnions, two units of 12 Peltasts; 2 Elephants; and a unit of 24 Argyraspides. On our far right wing William has exactly the same forces. Marco commands the centre, comprising three large 36 figure heavy phalanxes. The usual mix of skirmishers is out front. I had decided to deploy all of the pikemen three-deep because we have a substantial height advantage. This explains why we overlap the enemy infantry line by so much. Can the enemy left break through, or will our left turn their centre? And what will happen when it comes to push of pike in the centre?
And then suddenly, it was all over. Gordon couldn't get past William on our far right flank. I couldn't get past Simon either, but at least I did quite a lot of damage. Marco swung the balance for us in the centre against Billy's phalanxes, and the Seleucids cruised to victory. It looked as though it would be a race for either left to swing around, but in fact neither really managed it. The phalanx won the day for us. Next up: Carthage tries to take Iberia again.

I built the Seleucid defenders, and deployed them symmetrically. I will run the left wing: 12 javelin-armed light cavalry; 8 Skythians; 12 Comapnions, two units of 12 Peltasts; 2 Elephants; and a unit of 24 Argyraspides. On our far right wing William has exactly the same forces. Marco commands the centre, comprising three large 36 figure heavy phalanxes. The usual mix of skirmishers is out front. I had decided to deploy all of the pikemen three-deep because we have a substantial height advantage. This explains why we overlap the enemy infantry line by so much. Can the enemy left break through, or will our left turn their centre? And what will happen when it comes to push of pike in the centre?
 |
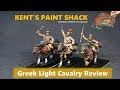
| Above you can see the massed Antigonid pikes, and in the distance their ominous left cavalry wing. Just at the top right Willliam has moved some cavalry forward to see if he can manage to disrupt the storm coming his way. Shot taken from my position on our left. |
 |
| A photograph showing most of our centre and right, at an angle. I originally deployed our phalanxes behind the hill, partly so that the enemy couldn't see their exact composition, but mostly to protect them from missile fire. They can always move onto the ridge later. |
 |
| My advance on our left forces Simon's troops to retire in front of me. He doesn't have the weight to withstand me here. |
 |
| Another side-on shot of the main part of the field. I have moved the Argyraspides off the hill at an angle towards the enemy centre; Marco is beginning to do the same with the main infantry body. In the distance, you can see the enemy left wing pressing forward. |
 |
| My cavalry continues to push Simon back. I have now angled in towards the centre here as well. |
 |
| Another angled shot. In the immediate foreground my Argyraspides are outscored by peltasts. |
 |
| My light cavalry presses forward aggressively. |
 |
| My peltasts join in to save the worst Argyraspides in history from being wiped out by enemy light infantry. The elephants on both sides bellow noisily at one another. Maybe it's mating season. |
 |
| Saved by the peltasts, the Argyraspides attack the enemy elephants and start to lose here as well. In the foreground the elephants clash. I need to inflict damage here so that I can turn the flank of the enemy phalanx, before they do the same to William on our far wing. |
 |
| Billy sends in his phalanxes one at a time against our hill position, rather than risk an all-out assault. One of his medium phalanxes goes in first, only to find our good unit of Argyraspides in fighting mood. At the bottom left corner of the shot you can just see a desperate struggle between the Antigonid guards and Marco's first phalanx unit. Gordon keeps trying to get around our far flank. |
 |
| A close-up of my rubbish Argyraspides fighting elephants. Fortunately for me, the elephants rolled badly as well. |
Empire Campaign Turn 10 finished: the half-way point

At the start of the next turn, we rolled a possible uprising in Gallia, but since no one borders it, nothing happened. The first game will be the Macedonians attempting to take Syria again. This one will be a Successors battle: Antigonids attacking Seleucids.
Rome Reconquers Magna Graecia
We played this game a couple of weeks ago. Work life became rather hectic, but now that it's the long weekend I should be able to catch up properly with the games stuff. Deployment map:
 The mercenaries of Carthage, stiffened by some Punic heavy cavalry and heavy infantry, have chosen a reasonably defensible position. Their left rests on a fordable stream, with a nice ridgeline for their massed infantry. The only piece of terrain that might afford the Romans some relief is a small low hill.
The Carthaginian army and deployment, from their right (top left of the map as you look at it), were chosen by William. Basically, it's all the cavalry on the open right, all the infantry massed in the centre and left, with extra reinforcements for the hill position. Lots of skirmishers are out front, with a lone unit of slingers on the other side of the stream. Simon will run the cavalry, Marco the centre, and William their left.
I chose and set up the Roman army. Or, rather, I decide to try out a variation on the legions suggested by William. Each of the four legions is composed of a block of 16 Hastati, a block of 16 Principes, and 8 Triarii, with Velites to the front. All of the Hastati and Principes count as heavy infantrymen with pila, while the Triarii are elite heavy spearmen. There are also the usual Equites and Italian light horse and medium infantry, as well as some accompanying Rhodian slingers and Cretan archers. Two possibilities present themselves. The first would be to mass the infantry in our centre right, with the flank resting on the stream, and all of the cavalry towards the open left. The other is to go for a more traditionally symmetrical Roman deployment. I choose the latter, keeping a lone unit of Italian light cavalry on the other side of the stream just in case the opposition has troops there too. You will see from the map that there are gaps between the Roman legions; I figure that their heavy fighting power will more than compensate. As well as that, the relatively small individual units will be able to manoeuvre quite well. Gordon takes the leftmost legion and the troops on the left of the army; Billy commands the central legions; and I run the rest of the army on the right. I'm hoping that the deployment will give the Romans some flexibility.
 |
| Above: the Romans advance. This shot is taken from my corner at the rightmost end of the Roman line. Gordon moves up aggressively with his cavalry. He also spots that he has an infantry overlap towards his left, and is able to use his superiority here to wheel the Italian infantry and his legion's Hastati to our left. This should neutralise the Carthaginian horse. |
 |
| Billy advances in the centre with the two Roman legions. I hang back on our right, trying to stay out of combat with the masses of enemy infantry on their left wing. In the meantime, they occupy the ridge to their immediate front. I won't be attacking that lot anytime soon. |
 |
| The photo above shows the relative positions on my wing. If I'm lucky, I might be able to use my extra light cavalry to wheel in and threaten the advance of the enemy centre. Clutching at straws! But anything that slows down the weight they have here will help. The plan is for Billy to pin their centre while Gordon rolls up from our left. I'll just try to survive as long as I can... |
 |
| An oblique shot of Gordon's attack. |
 |
| My wing holds position as the mass of enemy infantry comes forward from their hill. To the left of this photo you can see Billy's legions going forward. |
 |
| A close-up of my Principes. |
 |
| The combat on Gordon's left. His Italian infantry have joined in to help the outnumbered Equites against the enemy cavalry. The fight goes well for us here. |
 |
| Above you can see Billy's legions (in red for Romans), as well as the threat to my Hastati in the foreground. |
 |
| Gordon's plan goes well as his Hastati hit some enemy cavalry to the right of their infantry line (on the left of the photo as you look at it). If we can break through here, the Hastati will be in position to roll up the whole lot. |
 |
| The action to the right of Gordon's troops. Here, in our centre, Billy's Roman legionaries perform very well indeed. They cause multiple hits with their pila, and the enemy's response is pitiful. In other words, the Carthaginian combat dice are lousy... |
 |
| A wider view of the action at our centre right. Billy is able to angle his right legion's Principes to face the threat. This deprives that legion's Hastati of support, but it's beginning to look as though they don't need it anyway. Some of the enemy manage to squeeze by my white (Latin) Hastati. We need to hold out here and to the right a while longer. |
 |
| In the meantime, it's taking the enemy's Italian foot a while to cross the field towards my waiting Equites. I also have some Italian foot of my own, just at the bottom left of the photo above. |
 |
| A wide shot of our centre and centre-right. I have had to risk spreading my forces so as to hold up as many of the enemy as I can. This means that my Principes end up fighting before my Hastati. |
 |
| On my extreme right, the enemy infantry finally reach my waiting cavalry. My lights get ready to join in. |
 |
| Breakthrough! Gordon achieves his objective, and in style. There is a massive morale collapse as the enemy infantry facing him all run away. Billy holds out, and so do I (only just). A Roman victory. |
Tuesday 5 April 2011
Welcome to FIGZ
FIGZ is a show rather than a person, aimed at 1/72nd gaming and smaller, website here. Also, if you click on the profile under "Followers" you'll find links to different language websites.
Saturday 2 April 2011
Welcoming The Hermit
A warm welcome to you. Apologies if you have a blog, because Blogger won't let me find it using the profile view! If you do, though, please let me know and I'll return the compliment...
Indians repel invasion
I didn't make it along to the club on Tuesday evening, but it seems that a reasonable time was had by all as the Indians sent the Bactrian Greeks back to Bactria. Deployment map, courtesy of Gordon:
 The Indians are at the top of the map. Their right wing is a mixture of elephants and chariotry. Theor centre is composed of four large blocks of foot archers, with a nice ridgeline on which to nestle. And their left comprises three large units of militia grade horse. Many skirmishers seem to be out front. The invaders had a powerful cavalry wing on their left: two units of heavy lancers accompanied by two larger units of medium cavalry, with some elephantsand peltasts in support. Their centre phalanx (4 units) is poised to go over the hill towards the enemy, screened by skirmishing javelinmen. And their right has a mixture of light horse, inlcuding Arachosian bow cavalry, supported by light infantry and more elephants.
Here is Gordon's description as commander of the invasion:

Here is Gordon's description as commander of the invasion:
Every so often the rules, despite the points system, throw up a game where there is a clear imbalance. The Bactrians with their heavy phalanx and good cavalry are a sure thing to run over the Indians. It didn’t prevent their defeat.
As can be seen from the deployment the Bactrians had a preponderance on their left wing and needed only to defeat that part of the Indian army on the flat facing them to win the game. The concentration of bow armed light cavalry and peltasts on the other flank was well able to fend off the poor quality Indian cavalry and an elephant unit was available as a reserve. The Indians could not have deployed in a better way to suit the Bactrian deployment.
The game began with the Bactrians advancing all along the line. The Indians did not come to meet them. The Bactrian leftmost cavalry unit (no 1) engaged the chariots (no 5) to their front and although the odds were in their favour were defeated. The unit of cavalry (no 2) inside it and the flanking peltasts (no 5) attacked the elephants and were significantly outscored. Worse they did virtually no damage to the elephants. The phalanx now came up and destroyed the small Indian chariot unit that had got marooned in no-mans land between the armies.
There followed a bout of morale and impetus inroad failures in the Bactrian cavalry and elephants and this became endemic leading to paralysis of the Bactrian cavalry wing.
A unit of the phalanx pushed through to attack the Indian infantry unit no 5 at the end of the Indian line and was trounced in three turns allowing the Indian unit to attack the adjacent phalanx which was by this time engaged with the elephants.
On the other flank Indian cavalry got in among the horse archers and although eventually destroyed by peltasts caused considerable damage. Things might have been much worse but for the abysmal shooting of the Indians.
The Bactrian losses had now mounted beyond their break point and although the Indian were approaching their (much lower) break point there was a clear winner.
The Bactrians lost:
1.because of their inability to break through on the extreme left and roll up the Indians from the flank. This left the cavalry embroiled with the Indian elephants and catastrophic morale failures completed their destruction.
2. the wholly unexpected destruction of a phalanx unit by a much weaker Indian infantry unit.
William's report from the Indian side:
Last night changed the world as the ancients knew it! Maybe there should be an option for the Indians to increase their sphere of influence (and likewise those others on the edge of the “major players” in this time of empires!). Simon seemed quite happy as he advanced the phalanxes into the withering fire of Billy’s Indian infantry last night – 3 turns of 48 shots caused less than a dozen casualties! Needless to say Billy was suffering from my questioning of his dice throwing (amongst other things which wouldn’t get past the thought police). Then when Simon charged home the Indians managed to destroy the first phalanx – after that it went down hill rapidly for the Graeco-Bactrians. Mark managed to hold our right flank with elephants and chariots and on my side my MG Indian horse managed to overcome their LC and LI opponents. Billy was obviously delighted that he “won” the war by killing of the phalanx but kudos should go to Mark who managed to take out all of the Greek 4-6 HC and a unit of 5-6 HC before he started losing his chariots and nellies. (I've removed some rules comments from William's report because they won't necessarily make sense to someone who doesn't have them).
Next up, in two weeks' time: Rome attacks Carthage in Magna Graecia again. That will take us to the half way Victory Points calculation, but from comments made by William among others, we might just not bother with Empire in and of itself from now on. It has turned into a really good battle generator, and some folks think that the Indians in particular should now be activated as a great power. We'll maybe have a confabulation after the next game.
On the Painting Tray: April 2012
March saw 24 completed Velites. I also managed to finish off the rest of the Romans with Dullcote, a smelly job indeed. In April I will mostly be painting more Velites, plus putting together a 1/48 Stuka divebomber that a friend passed over when my daughter turned six back in January. She thinks it's hers, so I'm letting her "help". She loves craft type things anyway. It will probably be more fiddly than the things I normally do, but hopefully not too much so - at least it's not a 1/72 kit. My ageing eyes and hands find those a real chore nowadays!
Subscribe to:
Posts (Atom)